The simplest way to migrate WooCommerce to Shopify is to use a dedicated migration app. It can bring across your products, customers, orders, images, inventory, and important SEO data while keeping the original WooCommerce store online during the move.
In this guide we cover two WooCommerce to Shopify migration services. We recommend MigrationPro, a Shopify store migration app, for its straightforward setup, trial migration, flexible data mapping, and access to migration support. We also cover Cart2Cart as another option.
The video below shows the complete MigrationPro process using a demo WooCommerce store and a blank Shopify store.
Although this is sometimes described as a WordPress to Shopify migration, this guide focuses on moving your WooCommerce store data, including products, customers, orders, pages, and blog posts.
Before you migrate
Before you begin, back up your WooCommerce database and files.
Set up your Shopify store
If you don't yet have a Shopify store, create one before starting the migration. You can begin with a free trial of Shopify and follow the setup prompts. Keep the Shopify store password-protected until you have checked the migrated data and completed the rest of your setup.
You can keep taking orders in WooCommerce while you prepare Shopify. Both MigrationPro and Cart2Cart offer a test migration, so you do not need to switch your live domain yet.
Method 1: MigrationPro (recommended)
MigrationPro is our recommended starting point for most stores. It provides an automated migration for stores that are comfortable managing the process themselves, along with a done-for-you WooCommerce to Shopify migration service for larger or more complex moves. Pricing depends on the amount of data and any optional add-ons, so review the current quote before committing.
1. Install MigrationPro in Shopify
Install MigrationPro: Store Migration from the Shopify App Store.
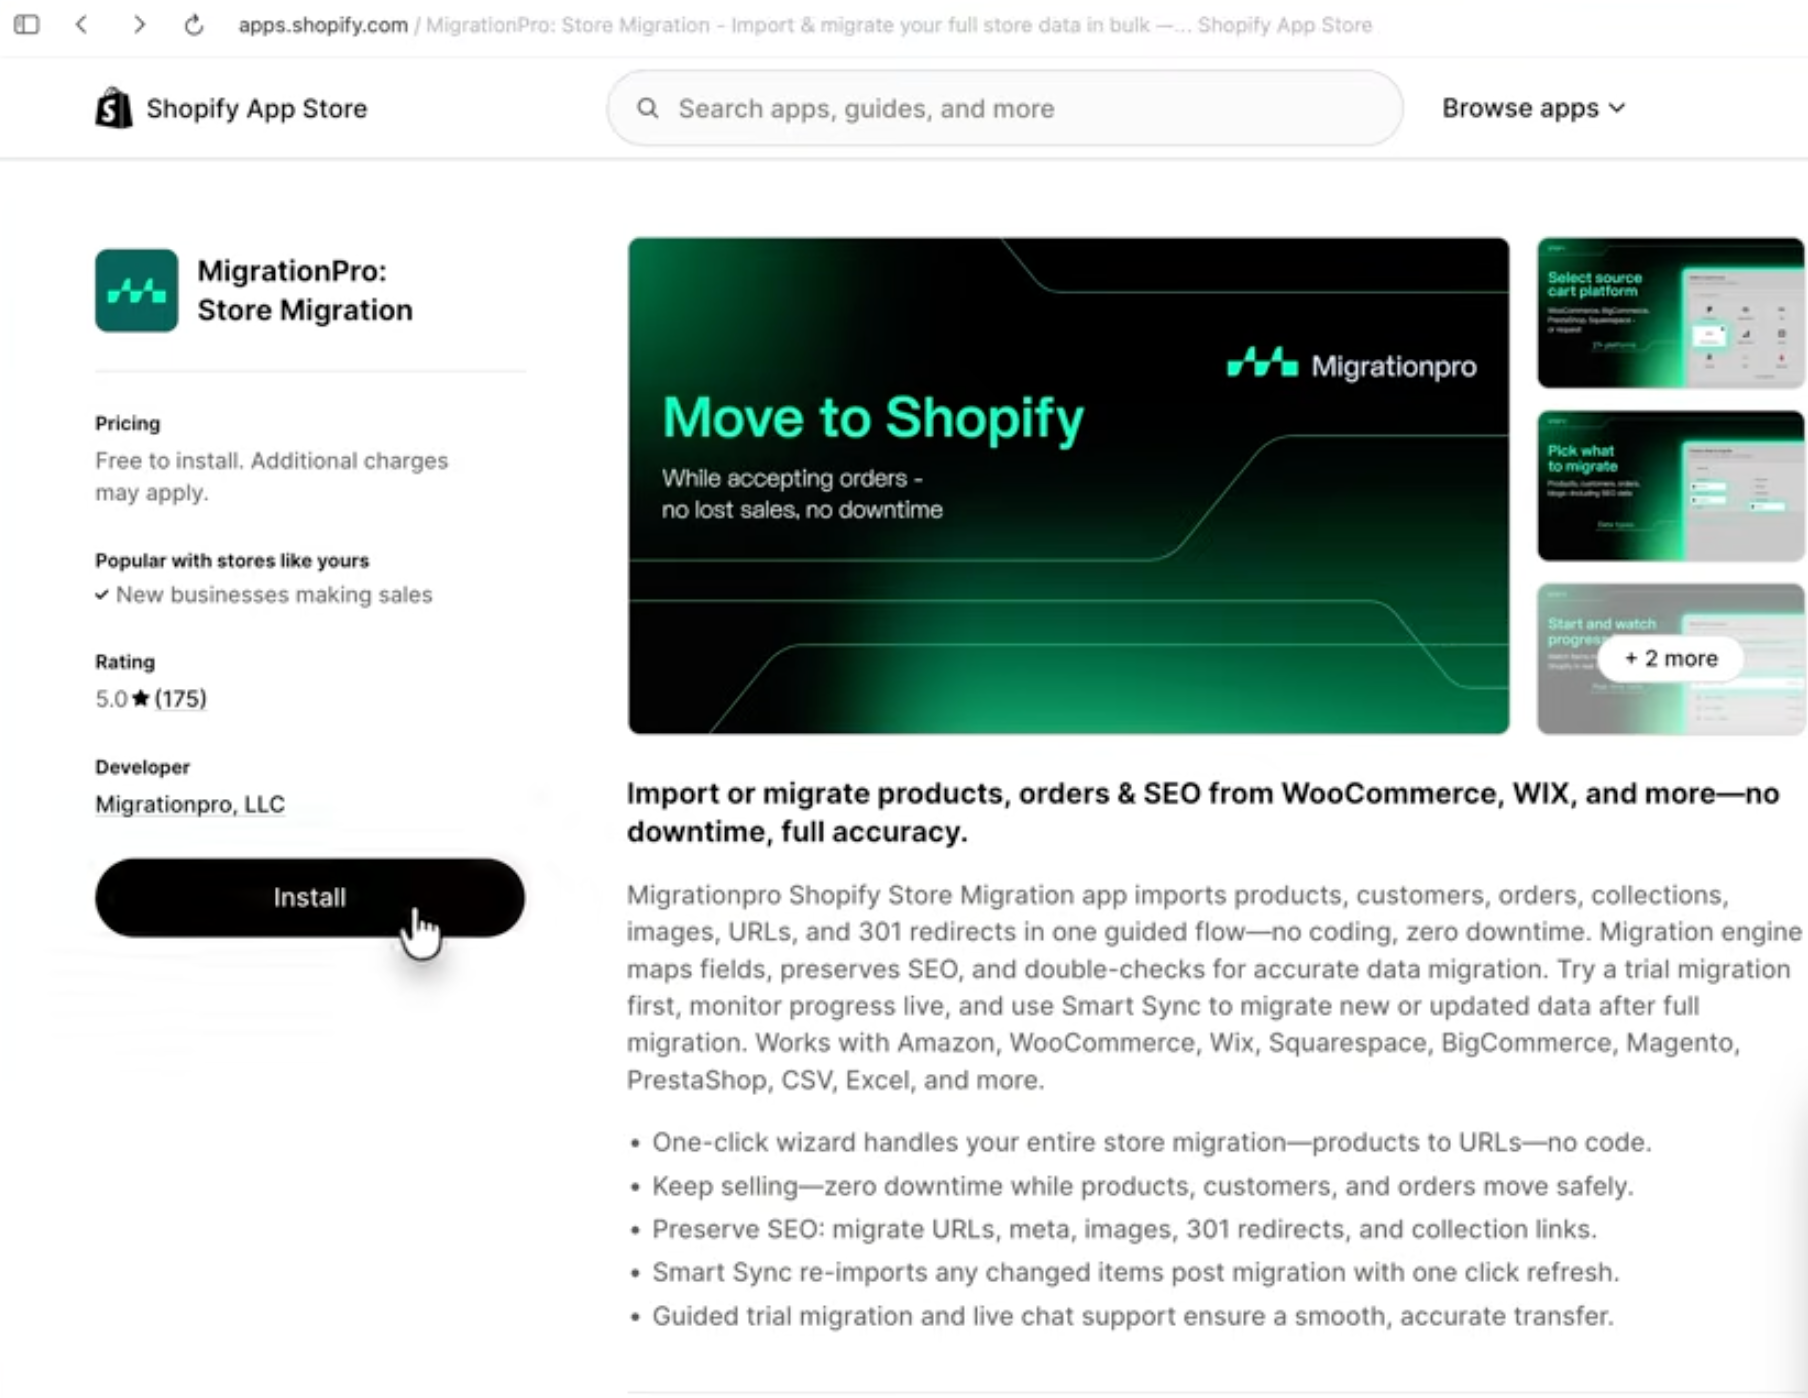
Once it is installed, open the app and select Create New Migration.
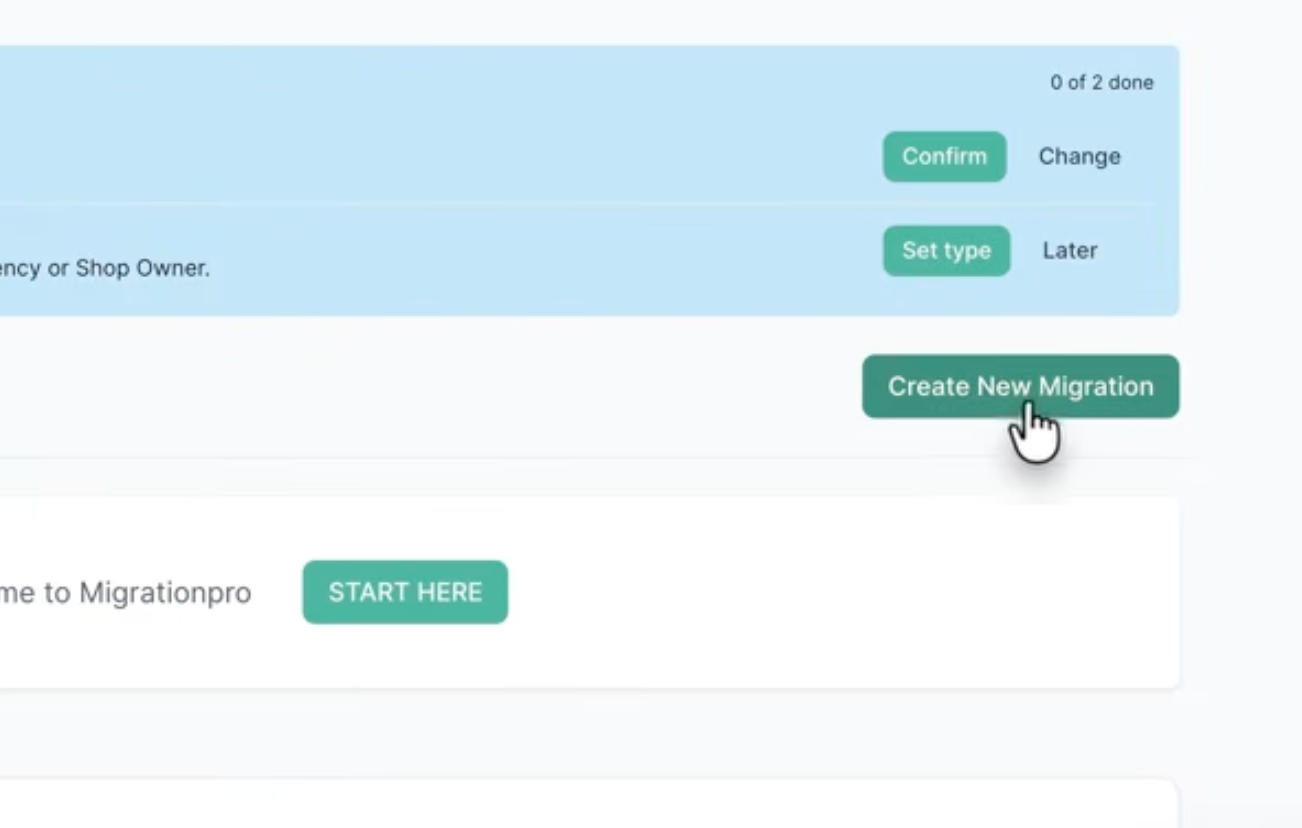
2. Choose how you want to migrate
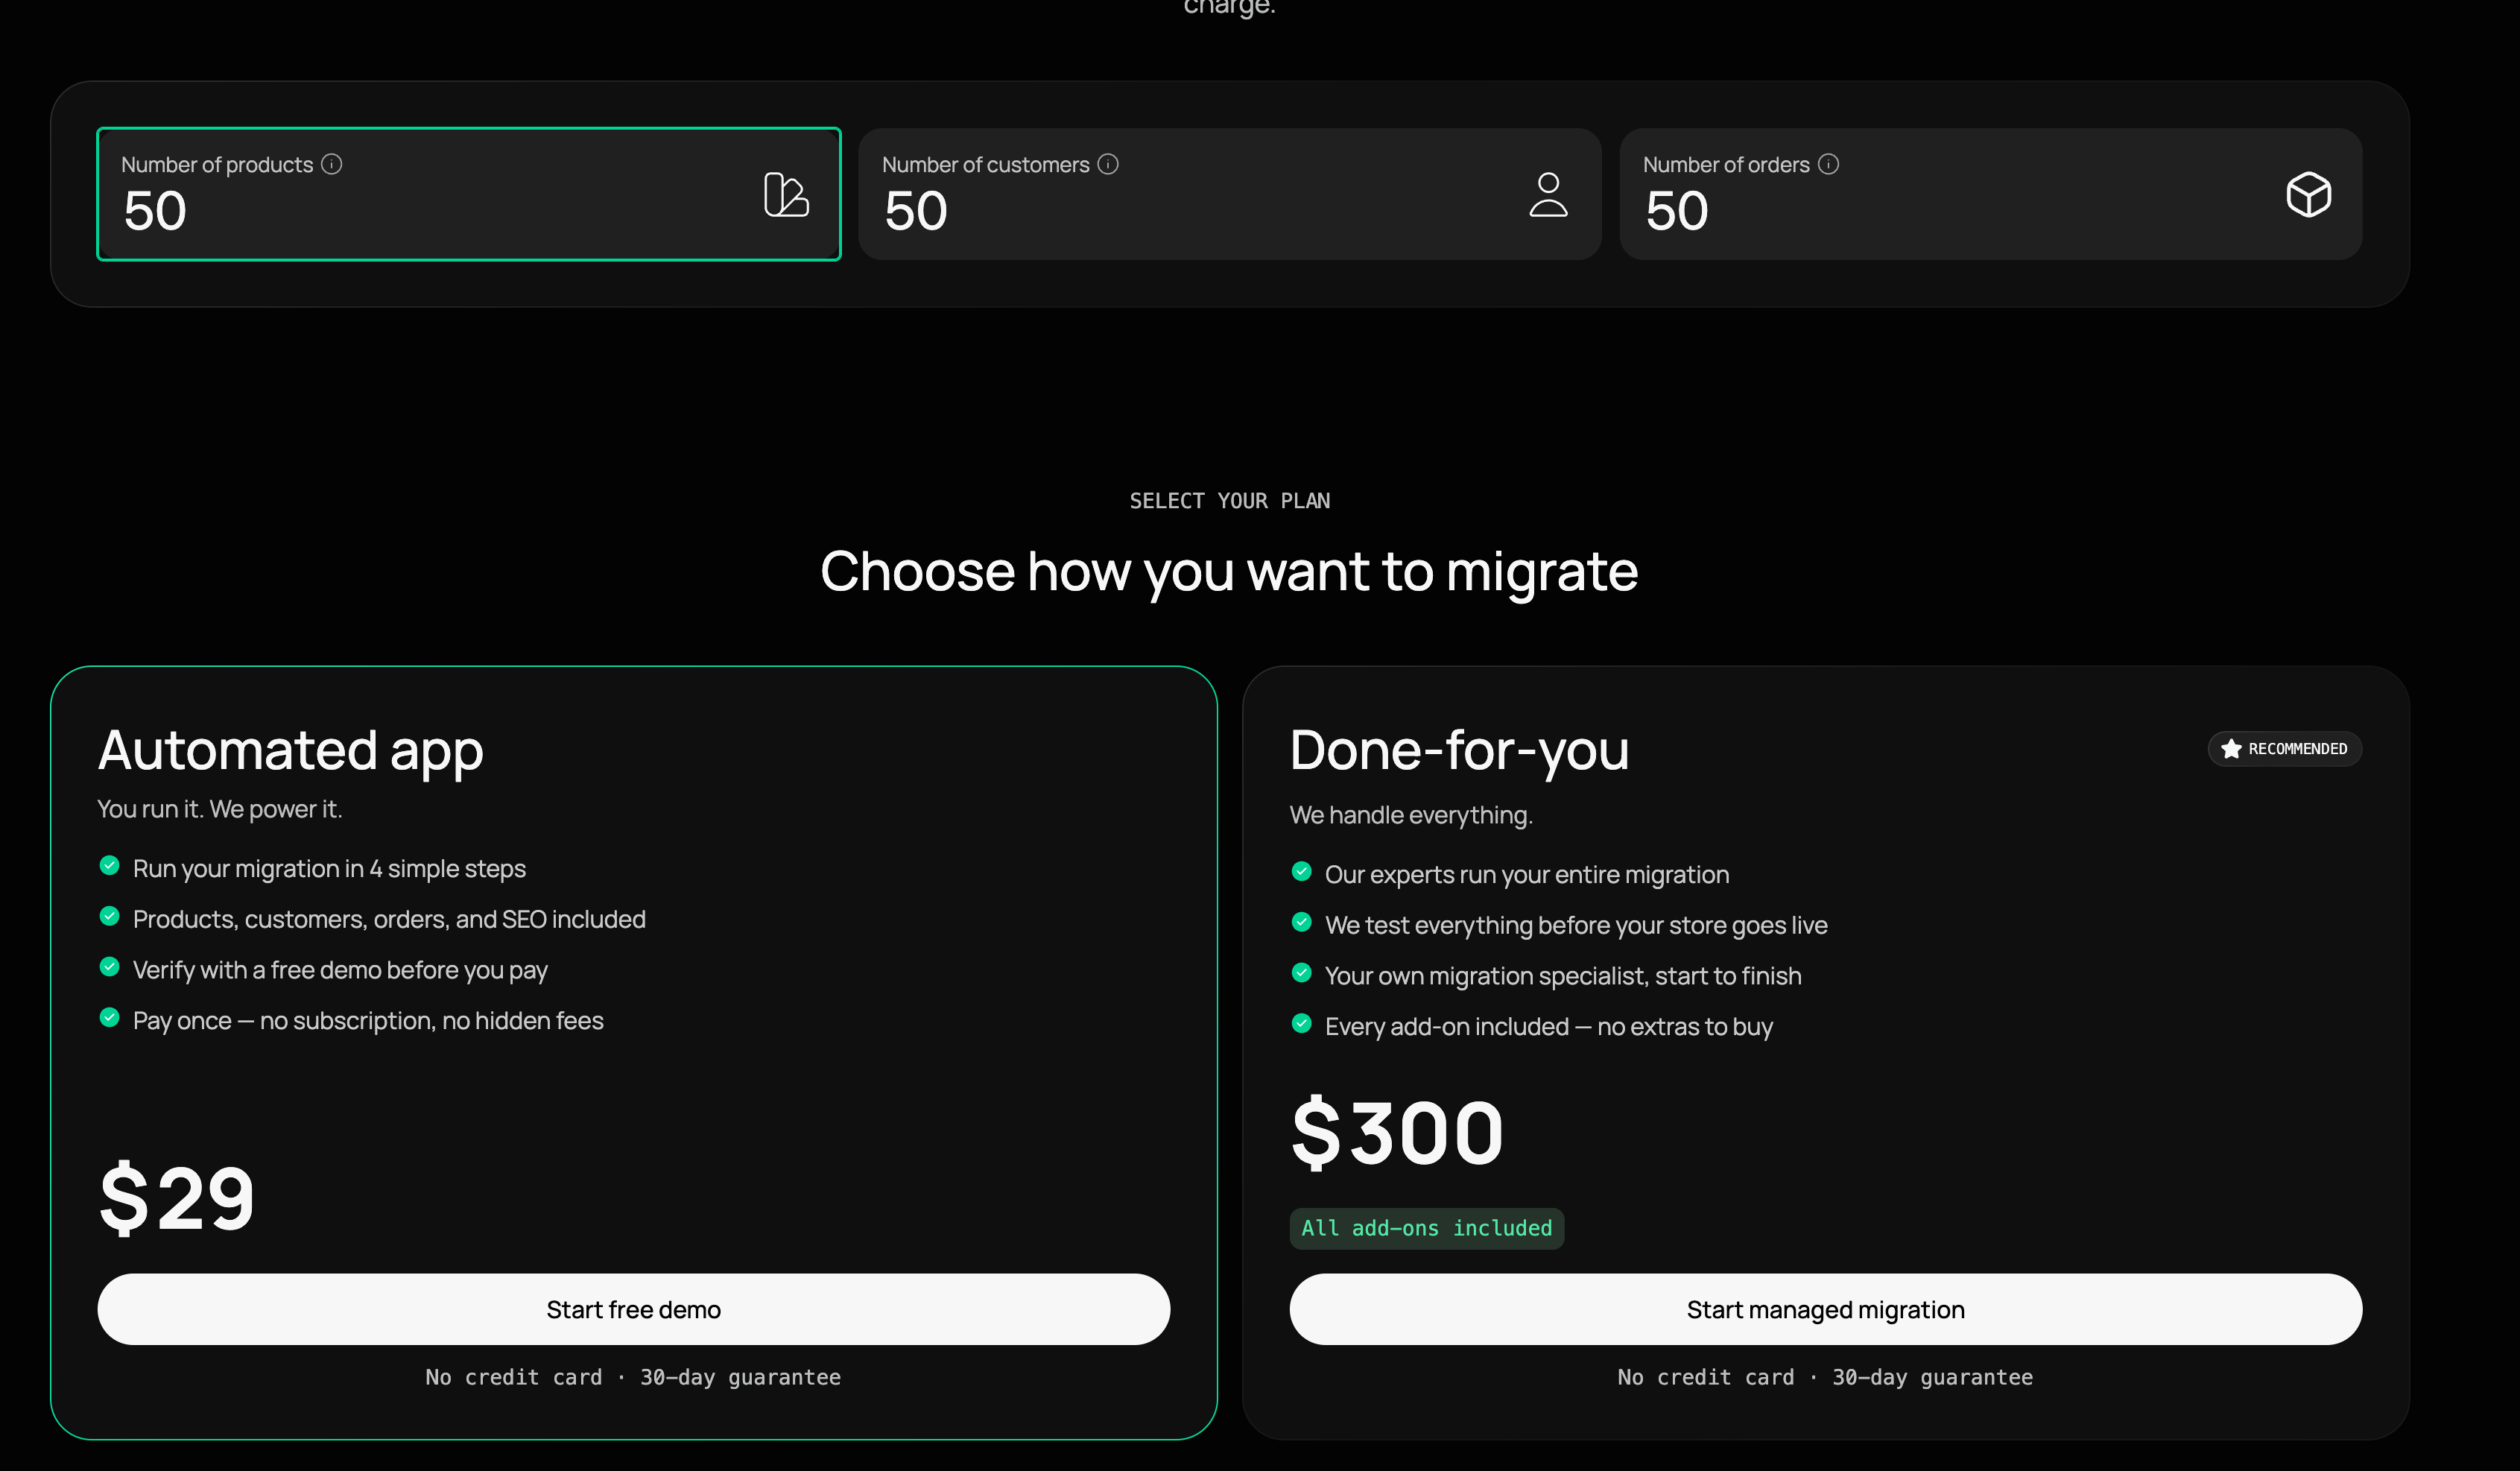
Enter the approximate number of products, customers, and orders you need to move. MigrationPro then lets you compare its automated app with a done-for-you migration. The automated option is the more affordable route if you are happy to follow the steps yourself; the managed option includes a migration specialist and the available add-ons. The prices shown in our video are examples for that store size, so check the current quote for your own migration.
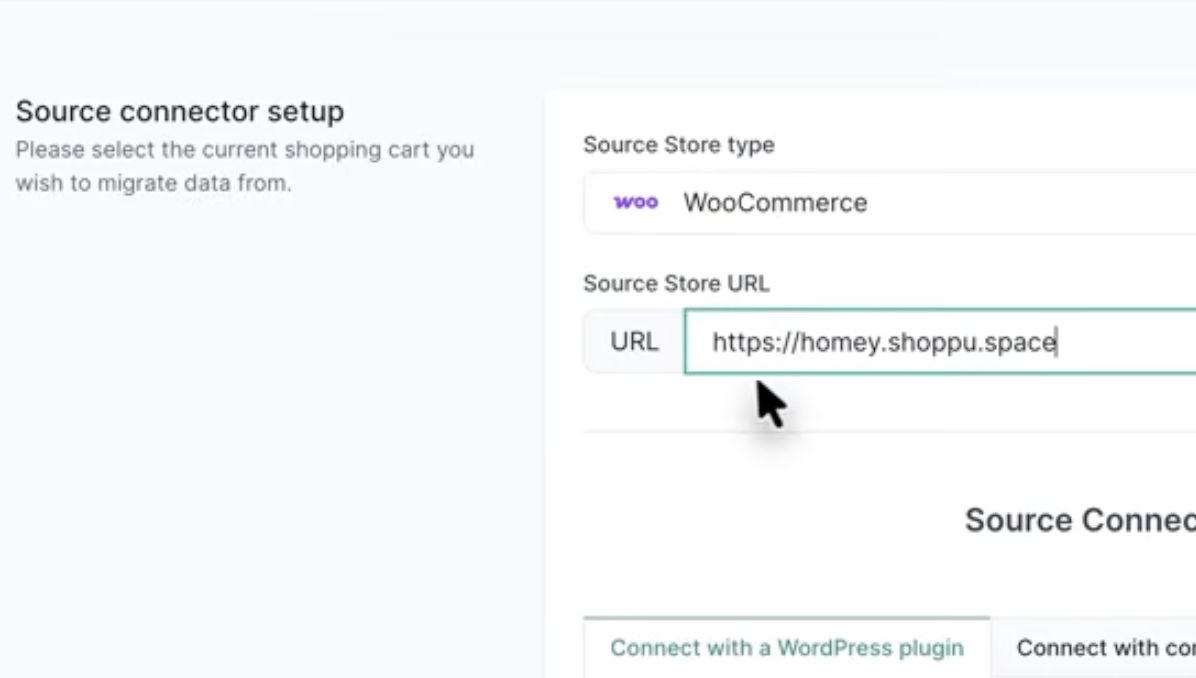
3. Add your WooCommerce source store
Choose WooCommerce as the source store type and enter the URL of the store you are moving. MigrationPro will then ask how you want to connect it.
4. Install the connector plugin
In order to connect MigrationPro to your WooCommerce store, MigrationPro offers multiple options. For this tutorial, we used the plugin method. Select Connect with a WordPress plugin, choose Manual installation, and download the connector ZIP file.
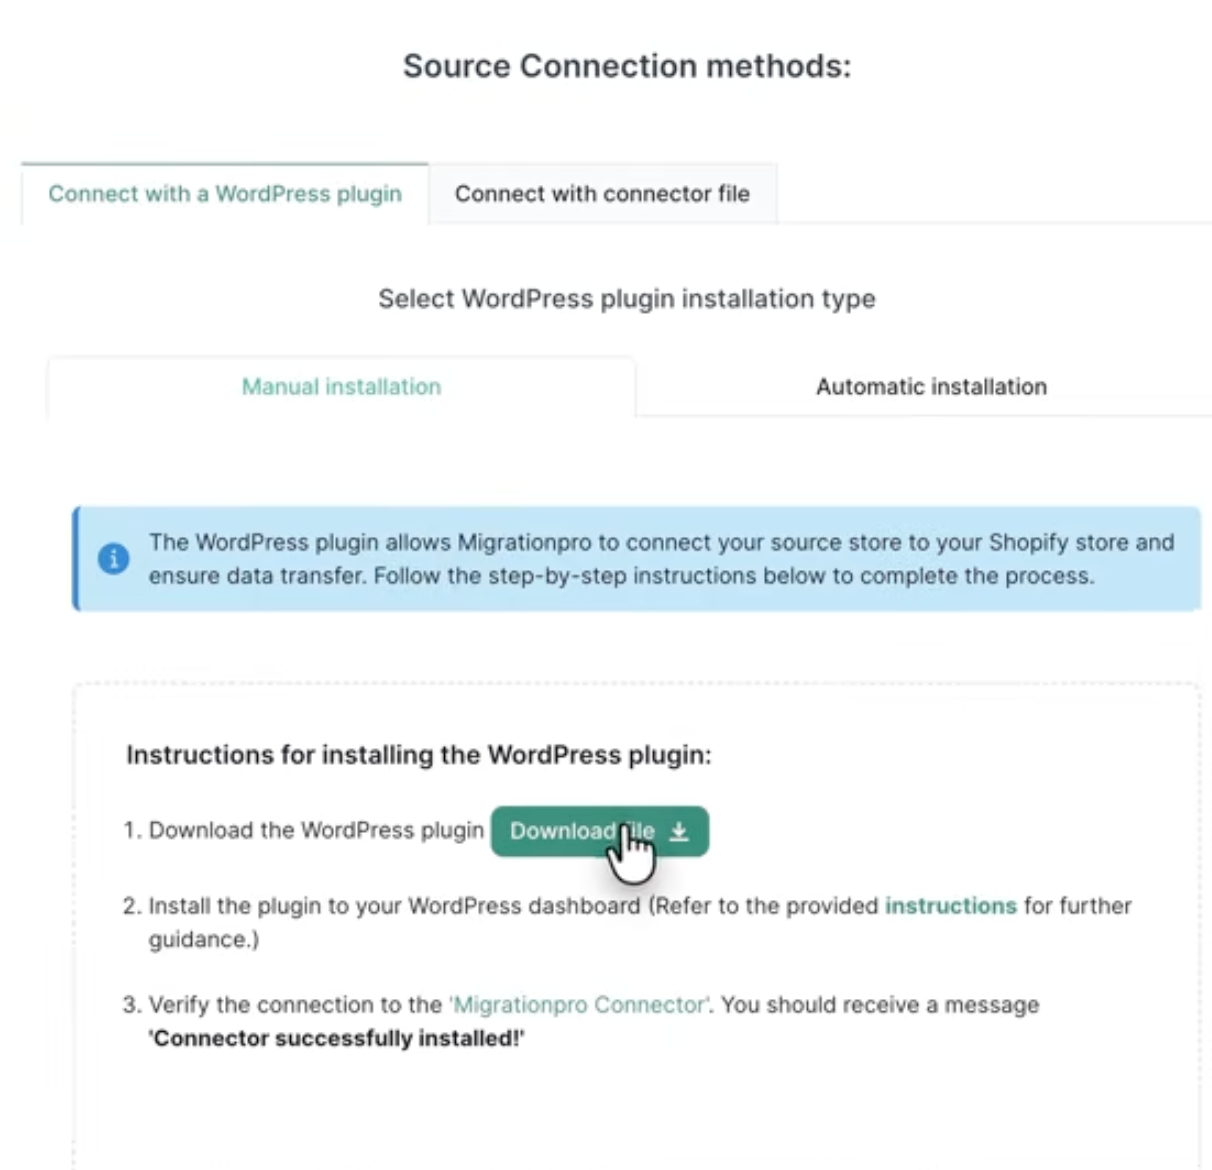
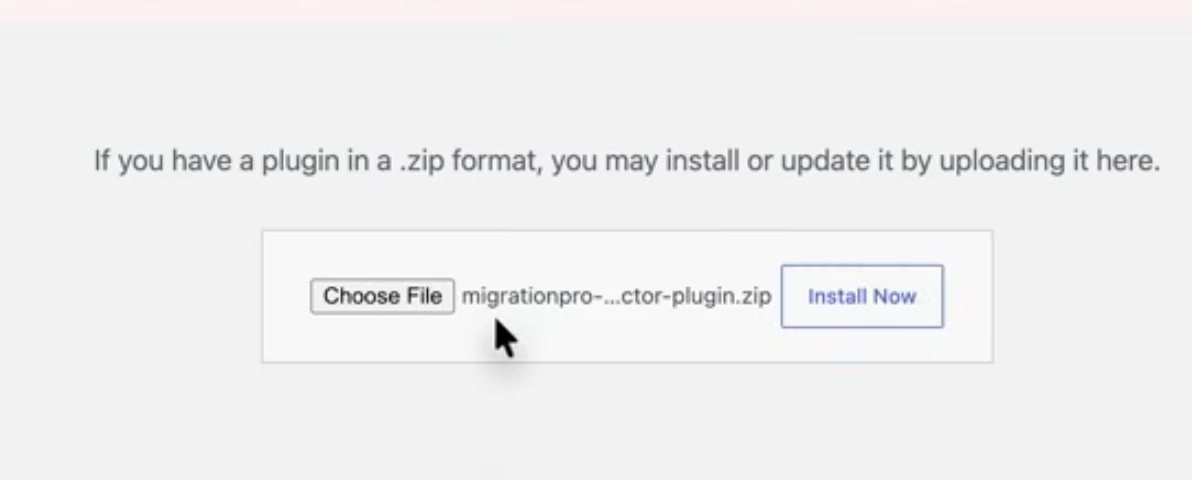
In your WordPress dashboard, go to Plugins, select Add New Plugin and then Upload Plugin. Choose the ZIP file you downloaded, select Install Now, and activate the plugin. Return to MigrationPro and confirm that the connector has been installed successfully.
5. Confirm the Shopify destination
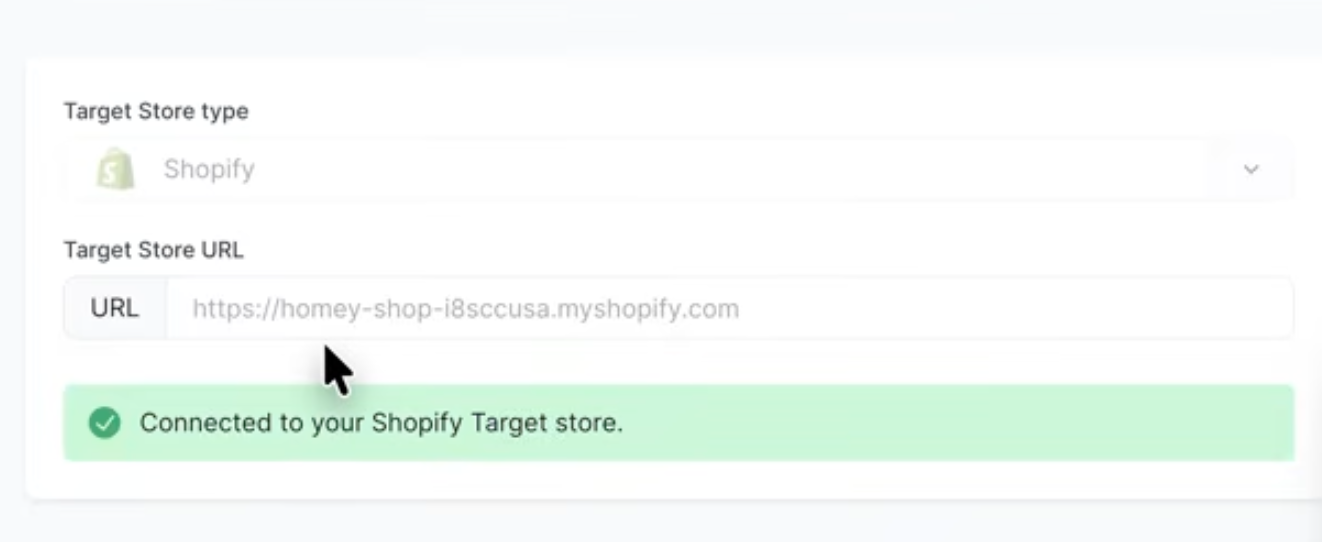
Your Shopify store should already appear as the target, with its myshopify.com URL filled in. Check that MigrationPro shows a successful connection before continuing.
6. Choose the data and migration options
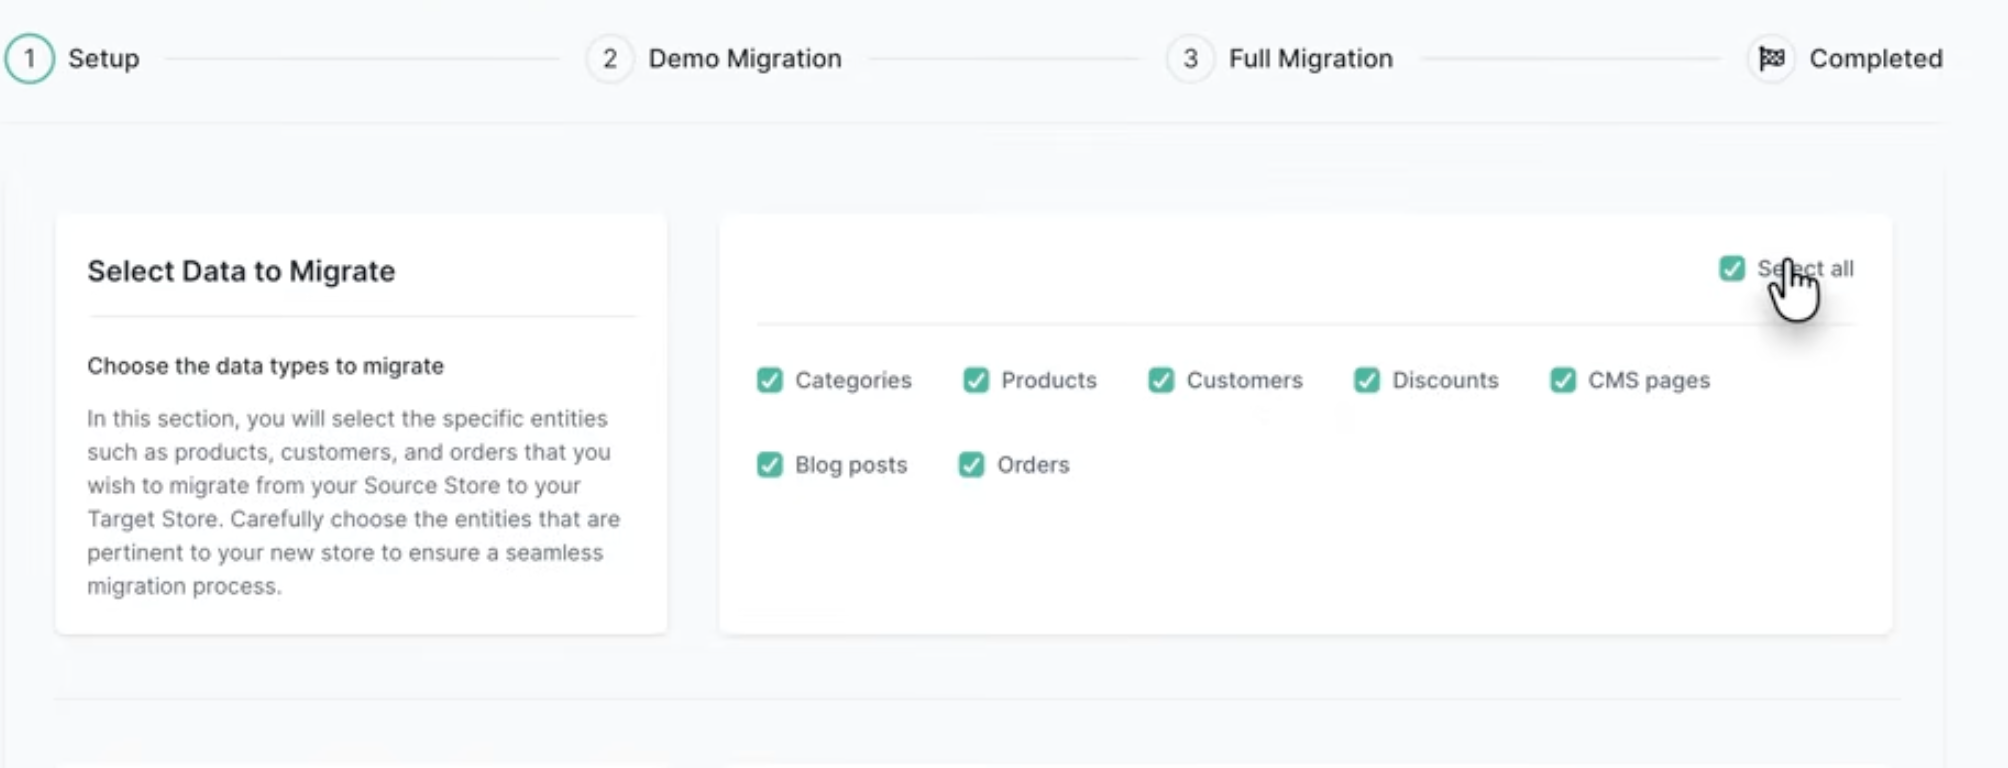
Select the data you want to bring across. MigrationPro can migrate categories, products, customers, discounts, CMS pages, blog posts, and orders. You can select everything or limit the migration to the data your new store needs.
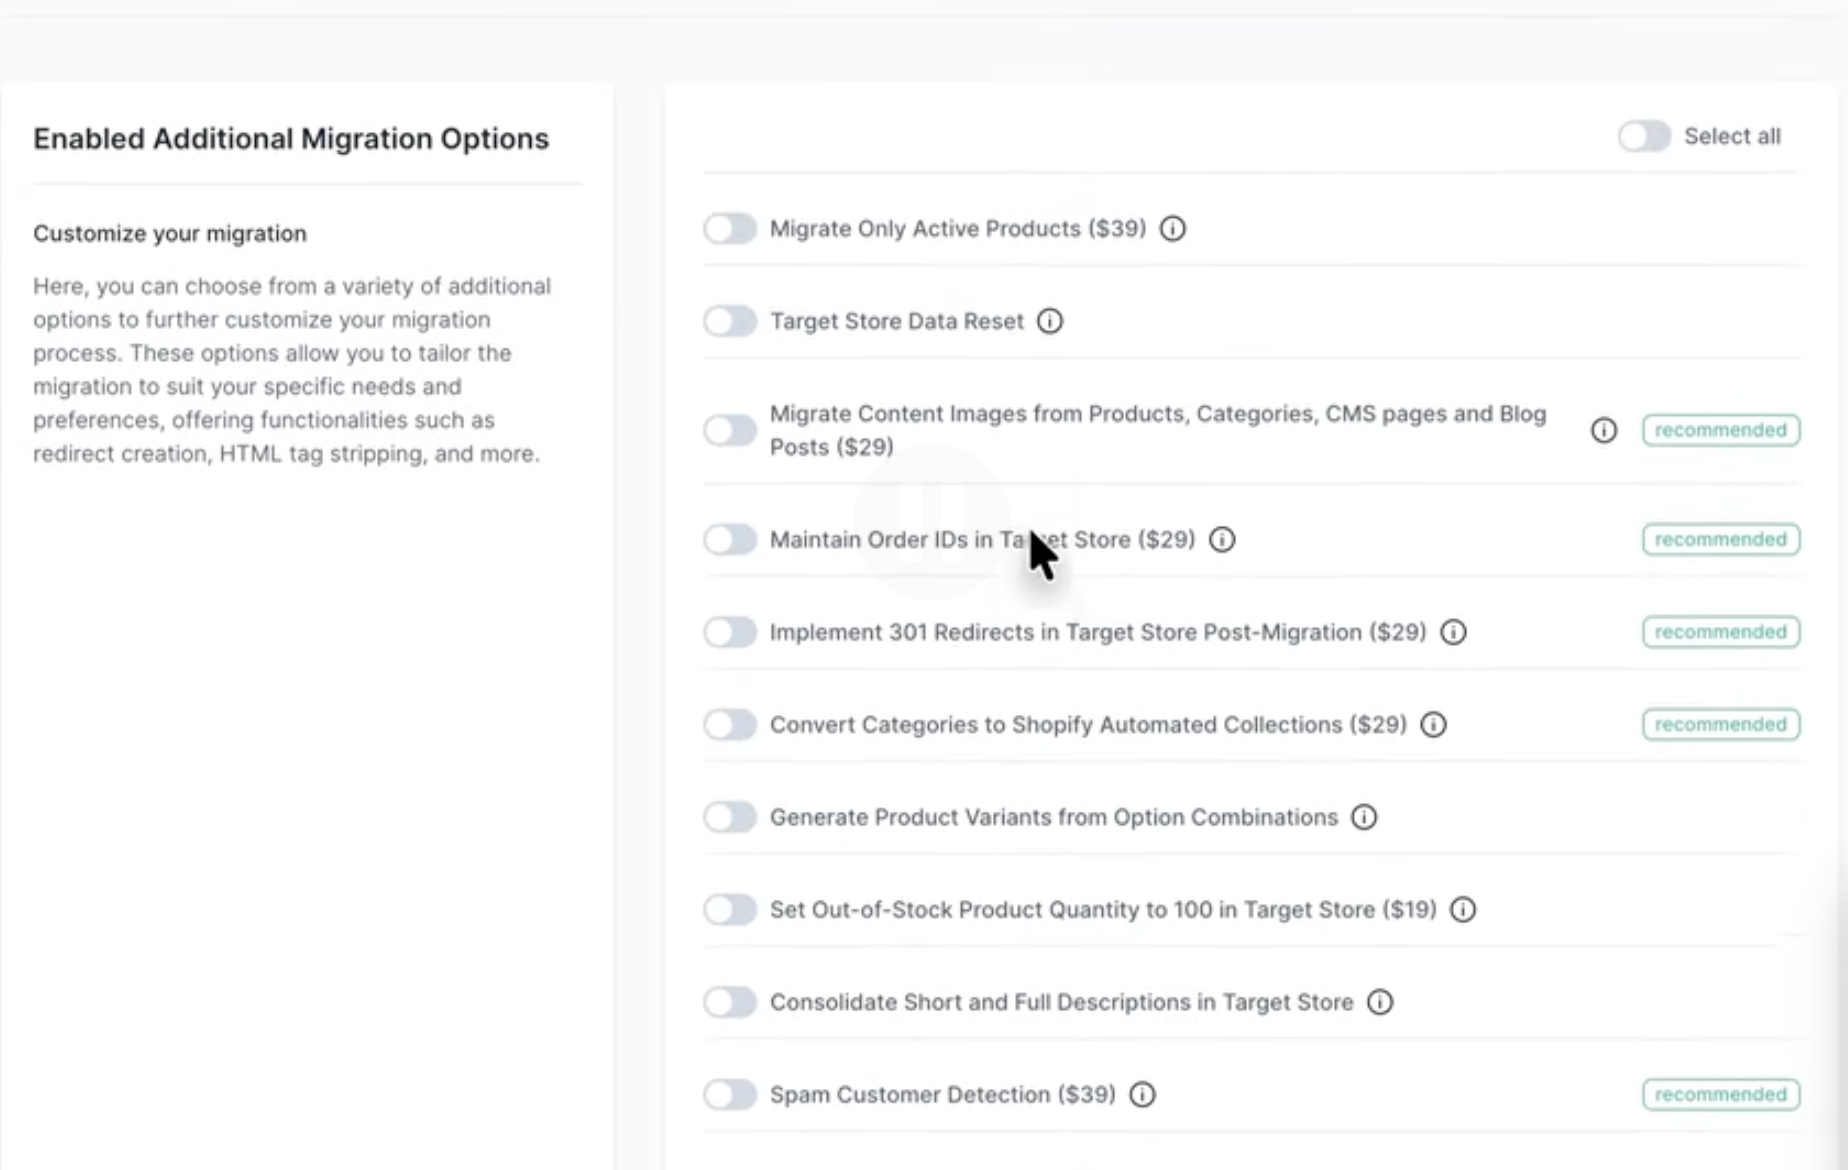
Next, review the optional migration settings and paid add-ons. These can cover jobs such as migrating content images, preserving order IDs, creating 301 redirects, turning categories into Shopify automated collections, generating product variants, and filtering spam customers. Choose these based on your store rather than enabling everything automatically, and check the current prices before continuing.
7. Review the order status mappings
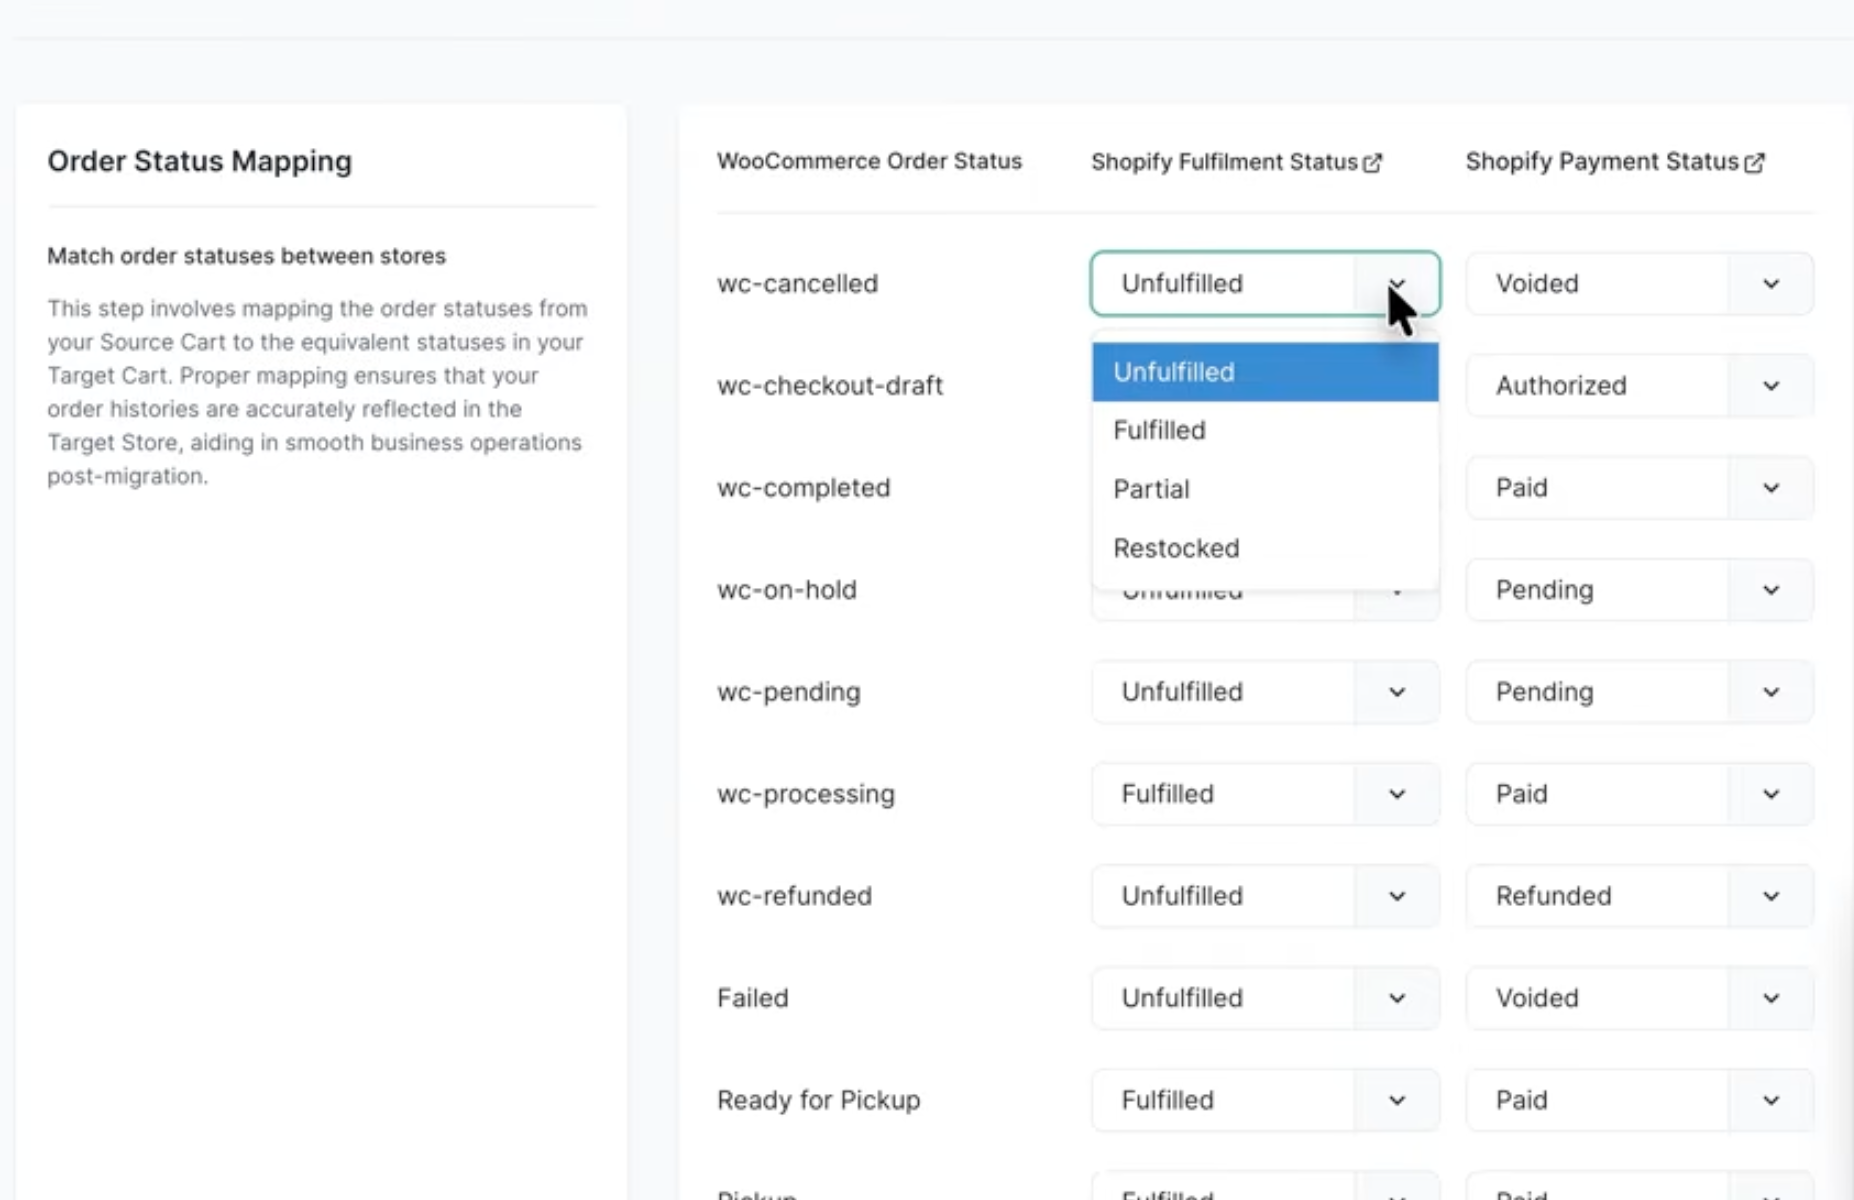
MigrationPro suggests how each WooCommerce order status should map to Shopify’s fulfilment and payment statuses. Review every row, paying particular attention to custom statuses, cancelled and refunded orders, and any status whose meaning differs between the two platforms. Correct mapping helps preserve an accurate order history after the move.
8. Run the free demo migration
Select Next: Run Free Demo Migration and let the test complete before paying for the full migration.
At the time of our walkthrough, the demo moved up to 10 items for each selected data type. That gives you a useful sample of products, customers, orders, and other records to inspect in Shopify.
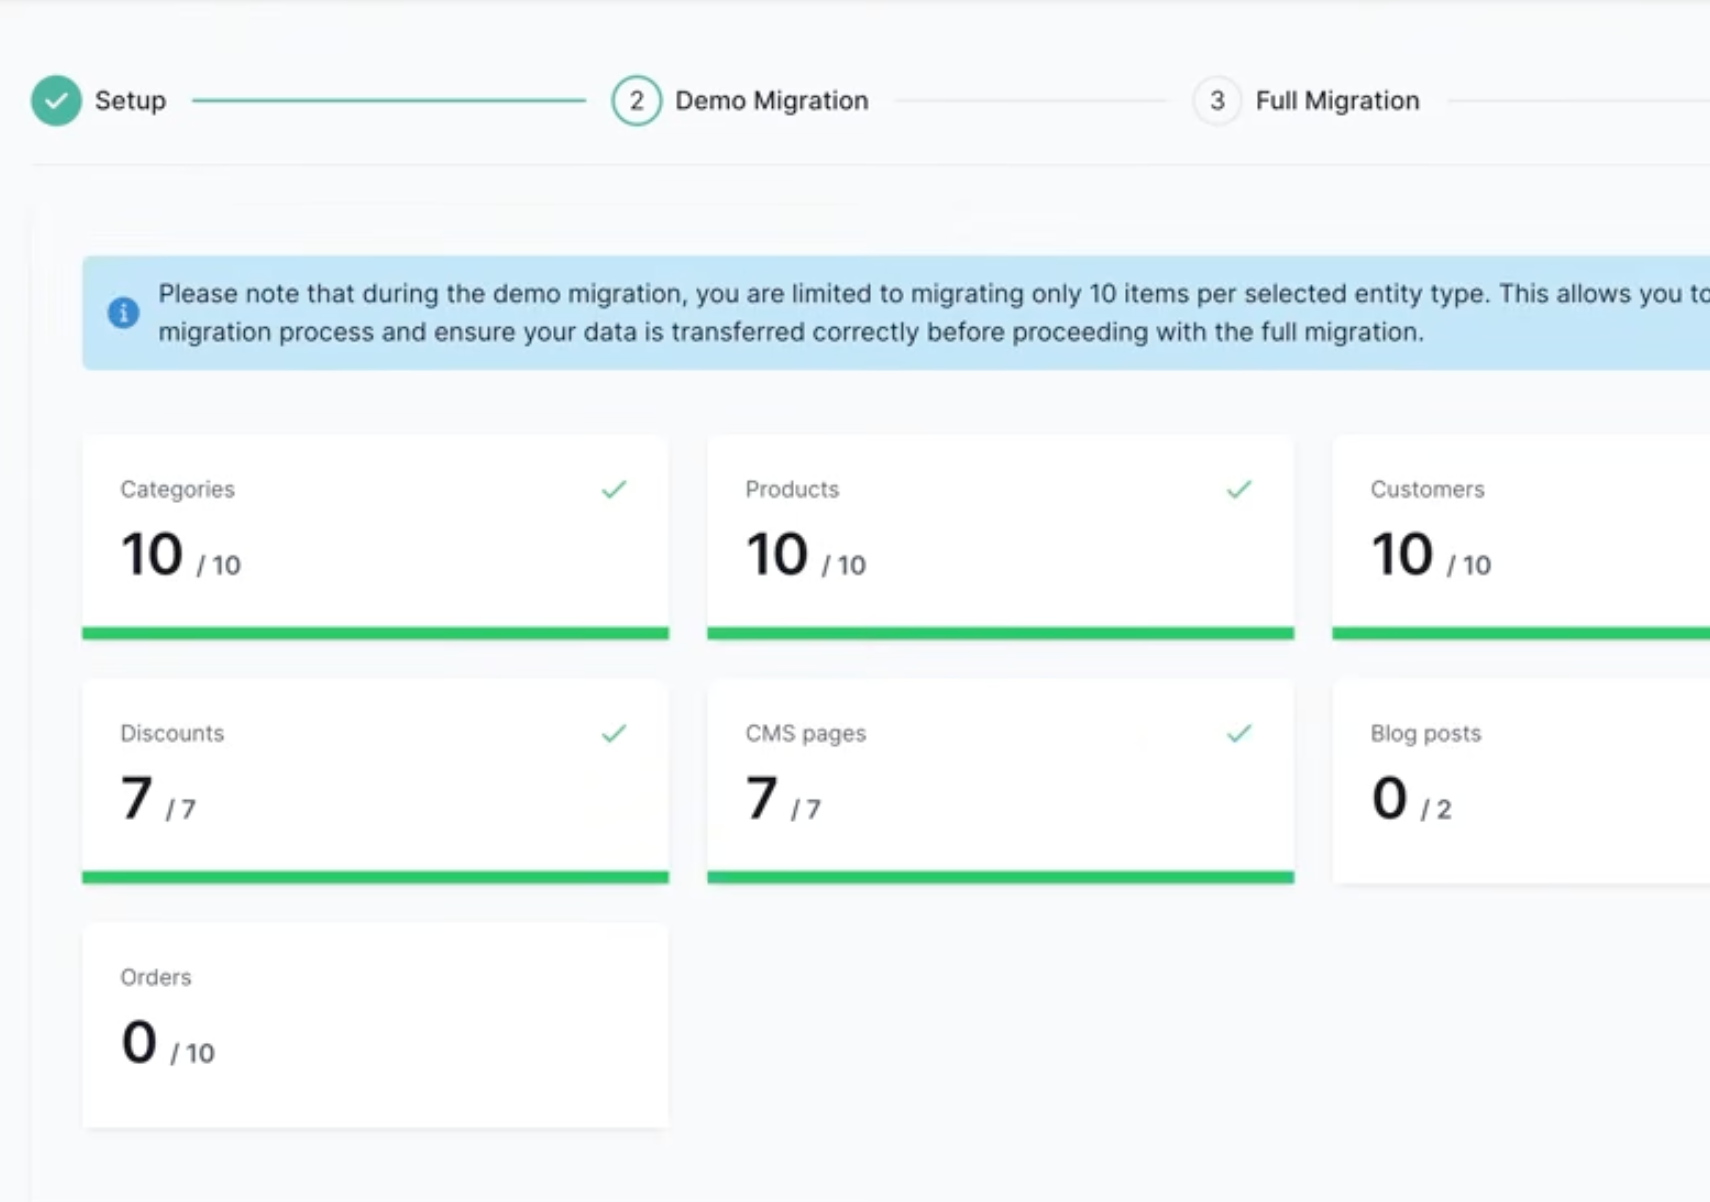
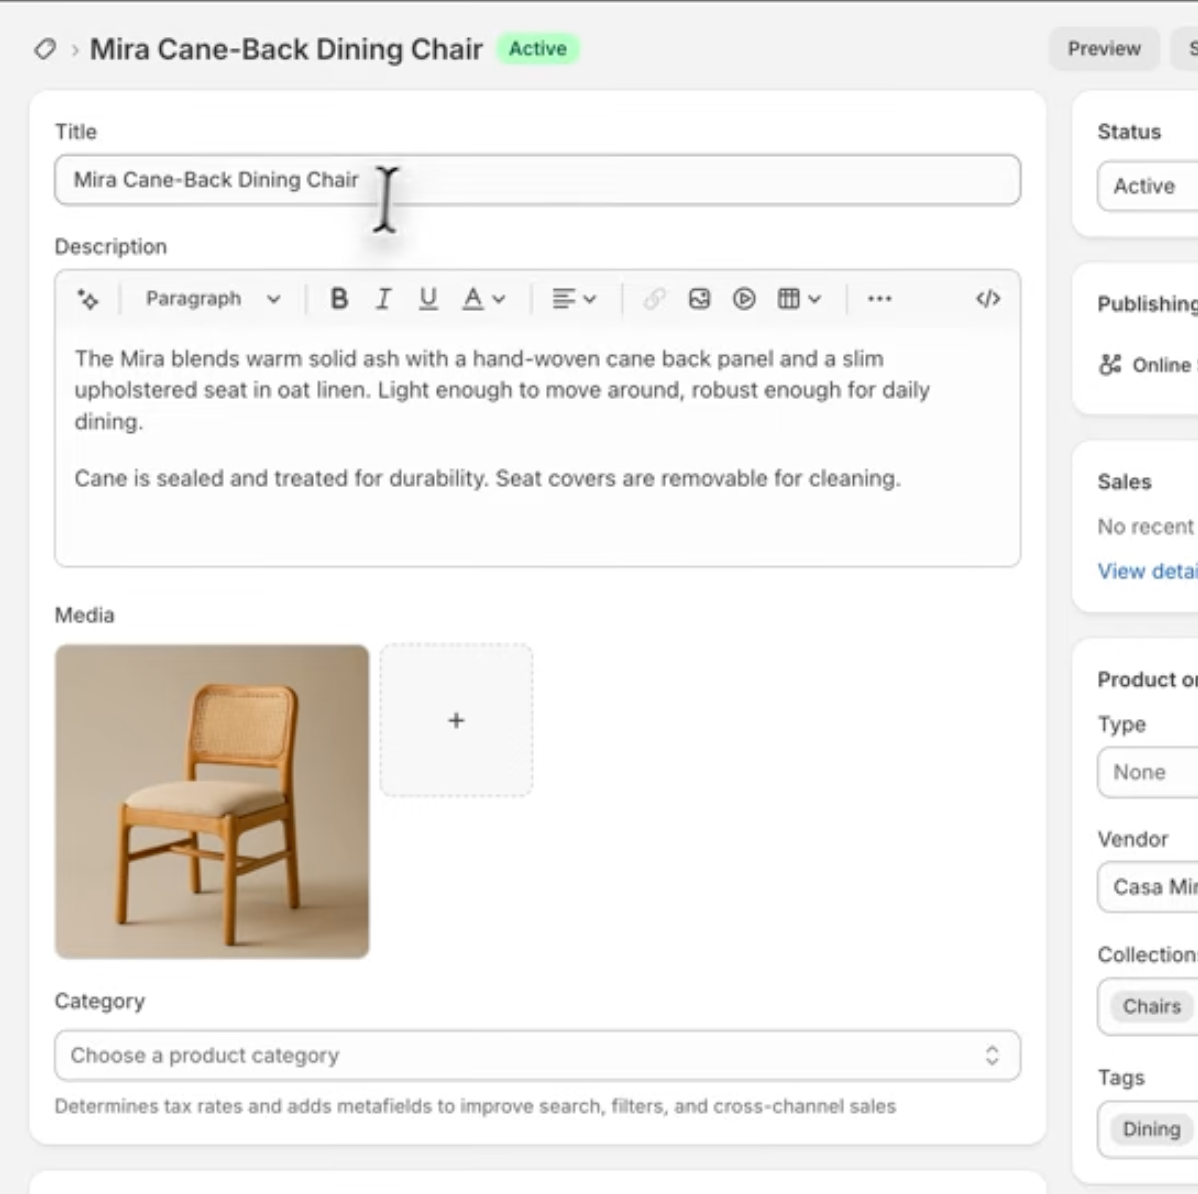
The screenshots below show the data successfully moved over to Shopify. The migrated products appeared in the product list with their statuses and inventory.
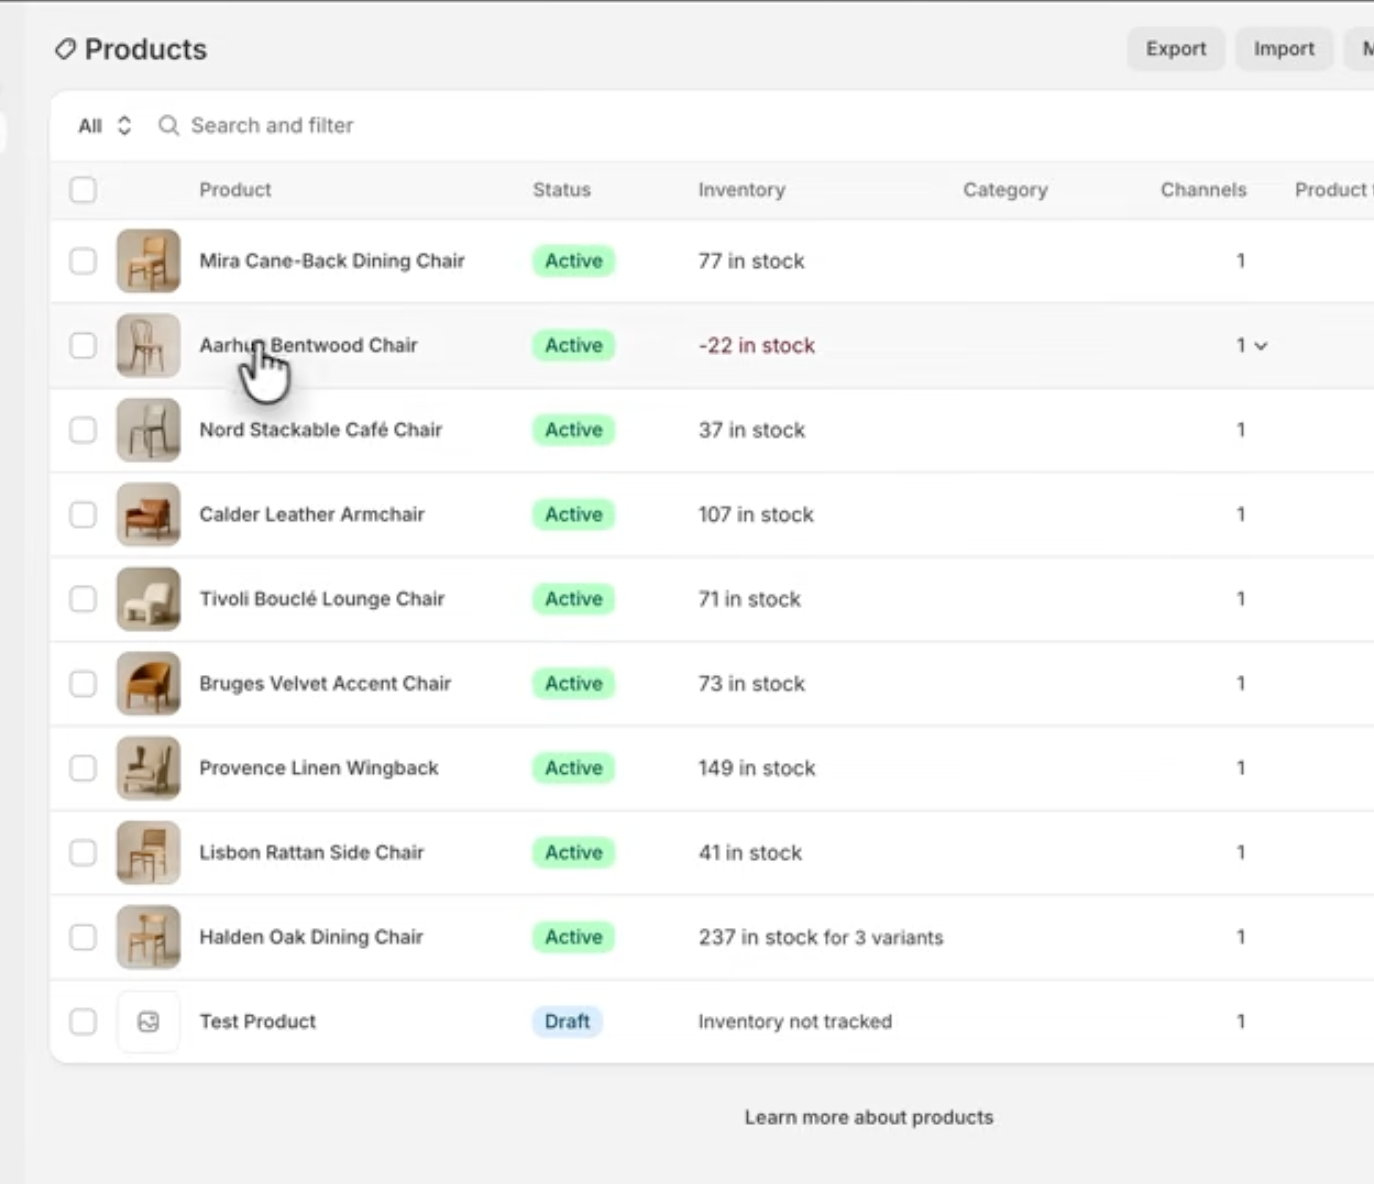
Individual products retained their titles, descriptions, images, prices, inventory, variants, categories, and SEO fields.
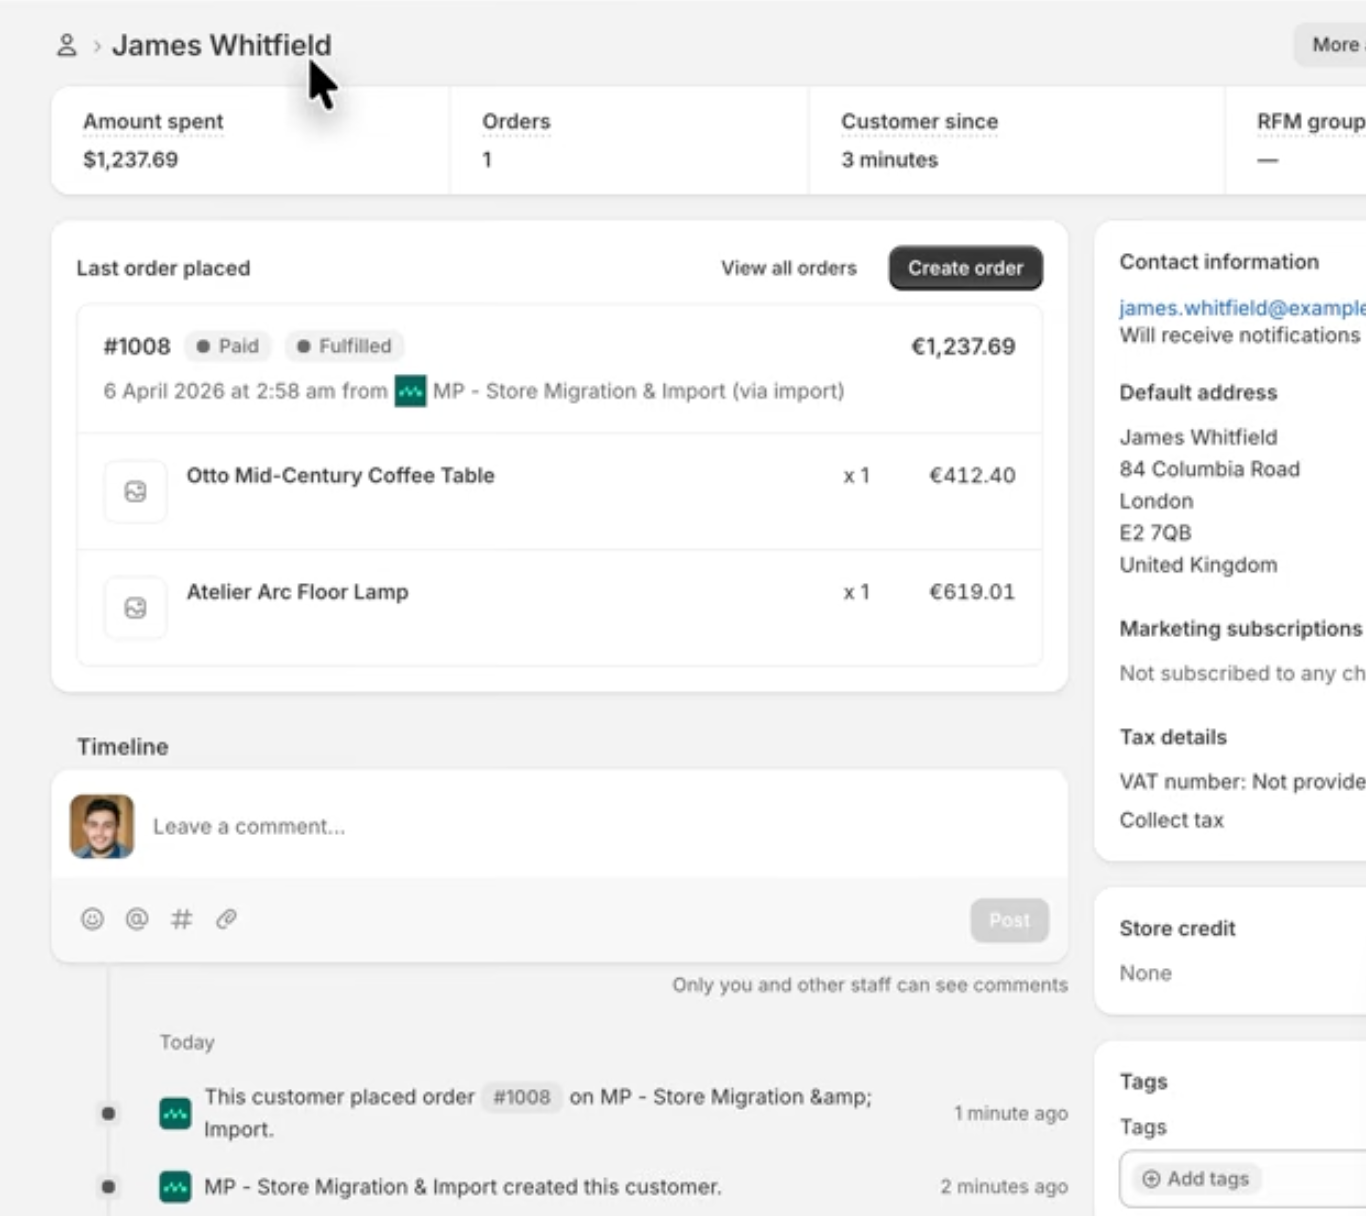
Customer contact details, addresses, and linked order histories also carried over.
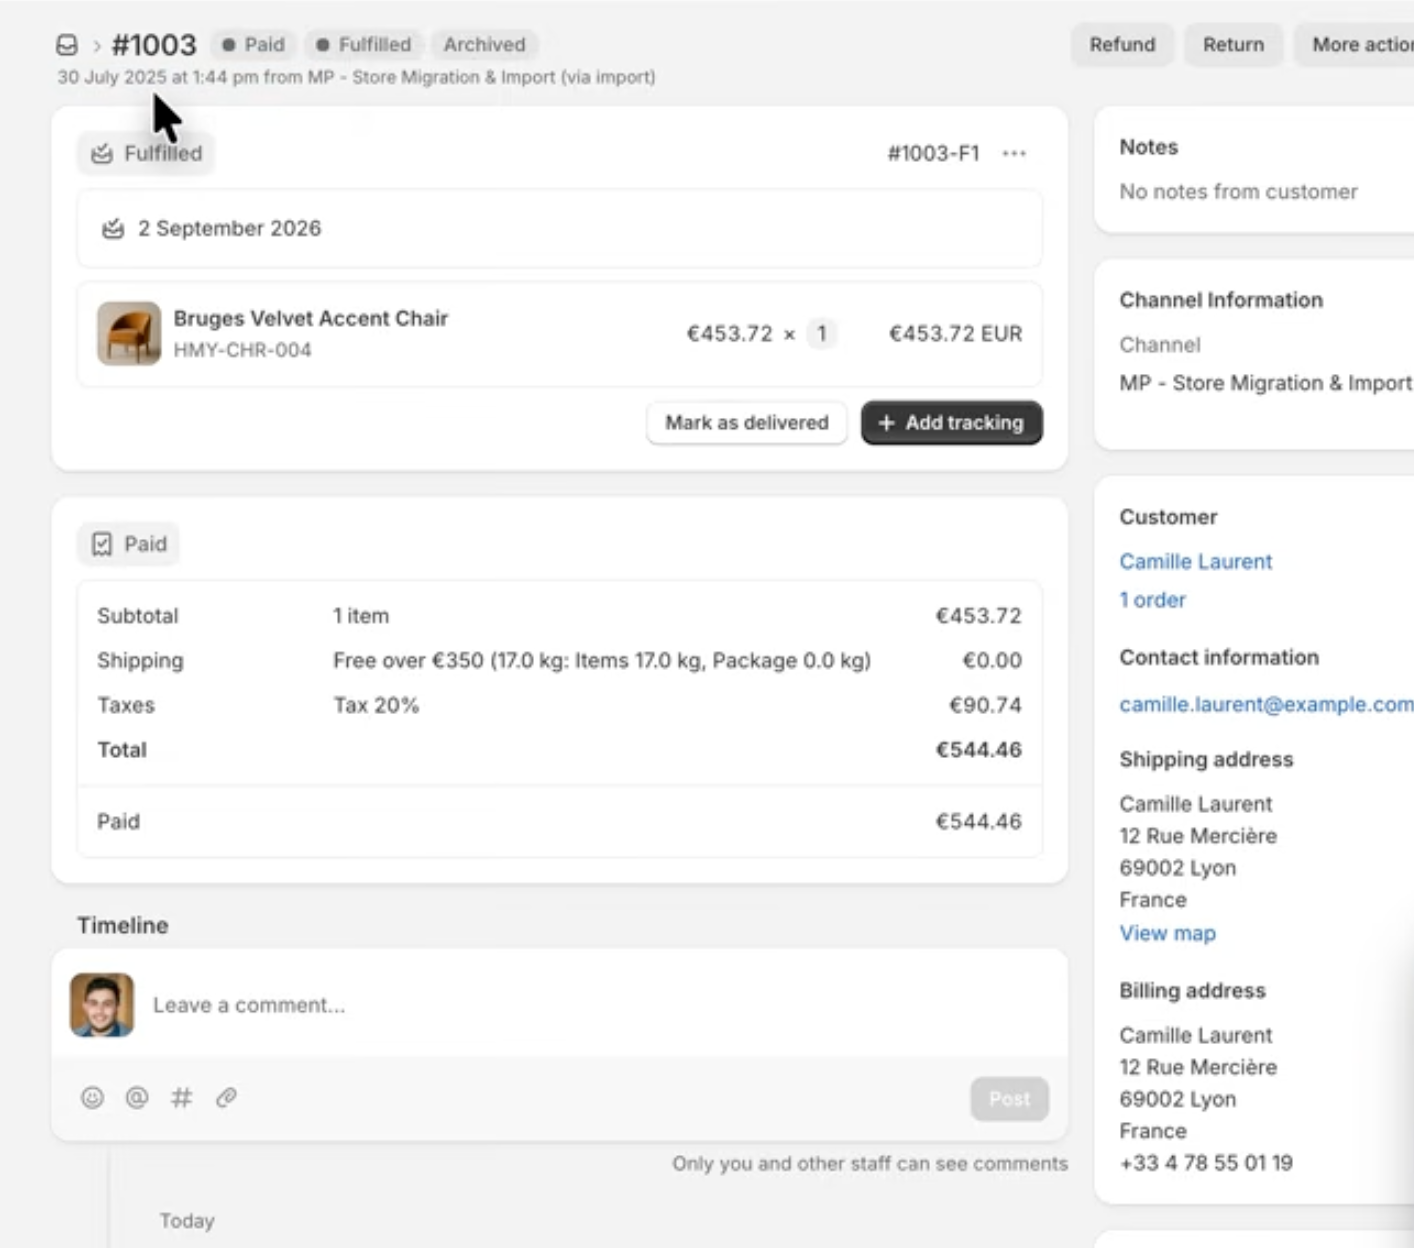
Orders retained their original dates, mapped payment and fulfilment statuses, line items, shipping, taxes, totals, and customer links.
9. Run the full migration
If the demo data looks right, confirm your migration options, pay the quoted price, and start the full migration. Large catalogues and long order histories will take longer, so leave both stores available and keep taking orders in WooCommerce while the migration runs. Before switching your domain, migrate or sync any data that changed during the process and complete the checks at the end of this guide.
Method 2: Cart2Cart
Cart2Cart is another established third-party option. The screenshots below were captured in 2022, so the interface and pricing may have changed, but the process remains useful: connect both stores, choose and map the data, run a demo, review the results, and then start the full migration.
1. Add the Cart2Cart migration app
Install the Cart2Cart app in your Shopify store.
Click Add app from the listing:

Once added you will be taken to the Cart2Cart website to register for an account.
2. Start the Cart2Cart migration process
After registering, you will be shown two migration options.
Click Start Free Demo in the left box to follow the migration wizard.
.png)
The Cart2Cart migration has three main steps.
Cart2Cart first runs a demo migration that moves a small sample of orders, customers, and products to Shopify. Once you have reviewed the sample, you can pay for and start the full migration.
Step 1
Enter your source store's information. This is your WooCommerce store's URL and connection information.

Below that, add your target store's information. This will be your empty new Shopify store's details.

Before moving to the next step, make sure to click the check plugin option to confirm that the app is installed correctly on your Shopify store.
If the connection is working, you will receive a confirmation and can move on to the next stage:

Click Choose Entities.
Step 2
Cart2Cart calculates the initial cost from the number of entities you are transferring and any paid add-ons. Select the data and options that suit your store:

Keep in mind that Cart2Cart first runs a demo migration. You can test the relevant options now and adjust your selection before starting the full migration.
Before running the free demo, map the order and customer fields from WooCommerce to Shopify.
Map each WooCommerce source order status to the appropriate Shopify target order status.
Additionally, Shopify has a fulfillment status as well, so you'll want to map that too.
The right mapping depends on your workflow. Below is the mapping we used for our example store.


Run the demo migration by clicking Start Free Demo.
You can optionally skip the demo, but we'd definitely recommend doing it to avoid any potential problems with the full migration.

Cart2Cart shows the progress of your demo migration:

Step 3
After the demo migration is finished, you can review what has been migrated to make sure it's as expected:

You can click on the actual products/customers/orders that are underlined to be taken to that item in the respective store:


If everything looks right, click Add Funds For Full Migration.
You can also edit the selected entities at this point if you don't want to transfer everything.

If you find a problem, contact Cart2Cart before paying for the full migration. This is particularly important when your WooCommerce store uses complex products, custom fields, or other non-standard data.
The full migration can begin after payment, either immediately or when you are ready, depending on the option selected.
Check your migrated store before launch
A completed migration is the start of your review, not the end. Compare the new Shopify store with WooCommerce before changing your domain or opening the store to customers.
Products: titles, descriptions, images, variants, SKUs, prices, inventory, weights, categories or collections, and SEO fields.
Customers: names, email addresses, phone numbers, addresses, tags, and order history.
Orders: original dates, customer links, line items, discounts, taxes, shipping, totals, payment state, and fulfilment status.
Content and SEO: pages, blog posts, metadata, image URLs, and a 301 redirect for every changed WooCommerce URL.
Store operations: payment methods, shipping rates, tax settings, notification emails, legal pages, installed apps, and analytics tracking.
Place test orders with several products, discounts, shipping methods, and payment types. Check the confirmation emails, refunds, fulfilment workflow, mobile storefront, and checkout. Once everything is working, run a final sync for data created since the first migration, point the domain to Shopify, submit the Shopify sitemap in Google Search Console, and monitor orders and redirects closely after launch.
WooCommerce to Shopify migration FAQ
Can WooCommerce customer passwords be migrated to Shopify?
Usually not. Passwords are securely hashed and the two platforms do not use an interchangeable format. Plan to invite migrated customers to activate their Shopify accounts and set new passwords.
Can my WooCommerce store stay live during the migration?
Yes. Keep WooCommerce live while you build and test Shopify, then use a recent-data or final sync before launch so new products, customers, and orders are not missed.
What will not move automatically from WooCommerce to Shopify?
Your WordPress theme, plugins, checkout customisations, payment and shipping configuration, tax settings, and many platform-specific features need to be rebuilt or replaced in Shopify. Custom data may also require special mapping.
How do I protect SEO traffic when moving to Shopify?
Keep a complete list of indexed WooCommerce URLs, migrate metadata where possible, and create permanent 301 redirects from every changed URL to its closest Shopify equivalent. Test the redirects before and after launch.
What is the easiest way to migrate from WooCommerce to Shopify?
For most stores, the easiest option is a dedicated migration app such as MigrationPro. It offers an automated process if you want to manage the migration yourself and a done-for-you service if you want its team to handle it.
What data can MigrationPro move from WooCommerce to Shopify?
MigrationPro can migrate categories, products, customers, discounts, CMS pages, blog posts, and orders. Optional settings and add-ons can also help with content images, order IDs, 301 redirects, automated collections, product variants, and other migration requirements.
How does MigrationPro connect to my WooCommerce store?
MigrationPro offers multiple connection methods. For this tutorial, we downloaded its connector plugin, uploaded and activated it in WordPress, and then confirmed the connection in MigrationPro. This method did not require us to provide a WooCommerce administrator login.
Should I run a demo migration before moving everything?
Yes. A demo lets you inspect a sample of the migrated products, customers, orders, and other data before paying for the full migration. At the time of our walkthrough, MigrationPro moved up to 10 items for each selected data type in its free demo.
How are WooCommerce order statuses handled in Shopify?
MigrationPro maps each WooCommerce order status to Shopify payment and fulfilment statuses. Review every suggested mapping before migrating, especially for cancelled, refunded, and custom statuses whose meaning may differ between the two platforms.
How much does a WooCommerce to Shopify migration cost?
The cost depends on how many products, customers, and orders you are moving, which migration service you choose, and any add-ons. In our video example, a store with 50 products, 50 customers, and 50 orders was quoted $29 for the automated app or $300 for the done-for-you service. Check the current quote before committing because pricing can change.
Can I migrate WooCommerce to Shopify for free?
You can run a free demo migration to test a sample of your data, but a complete migration is normally paid. Use the demo to check your products, customers, orders, and mappings before purchasing the full migration.
What should I check after migrating to Shopify?
Check product titles, descriptions, images, prices, variants, inventory, categories, and SEO fields. Also verify customer contact details and order histories, then inspect orders for their original dates, payment and fulfilment statuses, line items, shipping, taxes, totals, and customer links.