How to Create a Vanity URL in WordPress
There's Nothing Vain About Vanity URLs
What is the most interesting thing you see on this Spotify billboard?

Is it the Spotify logo? The pastel pink writing contrasted with the green background and yellow accents, that oddly all work well together? Or is it the classic 2018 minimal design?
For me, it’s none of these. What actually stands out to me is the URL in the bottom left corner. And not even the whole URL, just the part at the end - /2018.
The reason this URL is special is because it is a Vanity URL.
A vanity URL is a descriptive and memorable URL used to redirect and track users. In this case, it is used by Spotify to track exactly how many saw their billboards. If a user used the URL — spotify.com/2018 — they know can attribute that view to the billboard.
Vanity URLs can be used for links posted on social media, links made by your partners, promotion links, and more. What makes them so powerful, is that they allow you to track hits to your website not just digitally, but also in the real world — like in the example above.

Join me as I show you how vanity URLs work — and more importantly —teach you how to create a vanity URL in WordPress.
How does a vanity URL work under the hood?
While it may look like just a simple URL, there is a bit of technical work going on behind the scenes.
When you go to your browser and type in spotify.com/2018, you’re actually being redirected to another URL - a URL with an Urchin Tracking Module (UTM) tacked on.
And just in case you are thinking it, it’s not this type of Urchin:

What is a UTM link?
A UTM link is a link used to track the performance of a digital marketing campaign. It works by adding campaign parameters to the end of a regular URL and allows you to track exactly how the user made their way to your website.
For example, if you were sending out a link to your WooCommerce store’s summer sale in a newsletter, a UTM link could look like this:
https://yourstore.com?utm_source=newsletter&utm_medium=email&utm_campaign=summer_sale
When Google tracks the visit to this UTM link, it can easily classify that this user came from:
Source = Newsletter
Medium = Email
Campaign = Summer Sale
Conversely, if you were to just include yourstore.com in the newsletter, without any of the UTM parameters, Google wouldn't know that the user came from the newsletter. And you wouldn't be able to properly track how effective your newsletter campaign was.
Back to the Spotify Example
If we take a look at the Network tab of our Chrome Dev Tools after typing in the Spotify.com/2018 into our browser, we can see their UTM redirect in action.

Spotify.com/2018 is being redirected to -
http://spotifywrapped.com/?utm_source=vanity&utm_medium=wrapped&utm_campaign=2018q4_markets_single_brandbuilding_holiday
We can see the UTM parameters they have used:
Source = vanity
Medium = Wrapper
Campaign = 2018q4_markets_single_brandbuilding_holiday
This will then likely be tracked by their team using their analytics tool (eg. Google Analytics) to determine if the billboard campaign was effective.
For example, they could derive a ‘cost per billboard engagement metric by dividing the total cost of the ad campaign by the number of hits to their website via that specific UTM link.
Armed with our new-found knowledge on vanity URLs, we can now see why a vanity URL is a far more elegant solution than a UTM link itself.

How to create a vanity URL in WordPress & WooCommerce
Let’s run through the steps to get a vanity URL up and running in WordPress.
In this case, we’ll be using Google Analytics for some initial UTM tracking. If you’ve already got Google Analytics or similar tracking set up, you can skip straight to step 3 below.
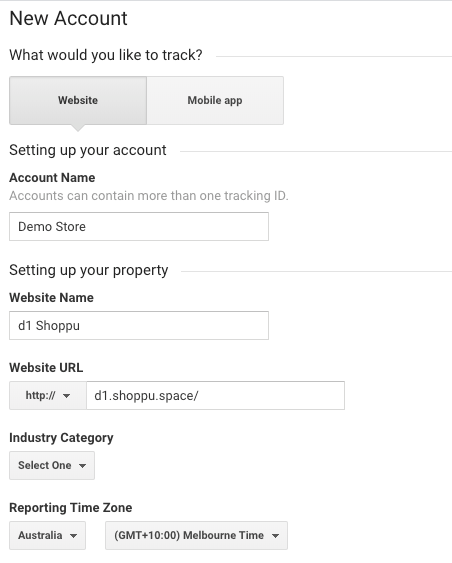
1. Step up a Google Analytics account (if you don't have one already):
Head to Google Analytics and set up an account. Enter in all your details and click Get Tracking Code at the bottom of the page.
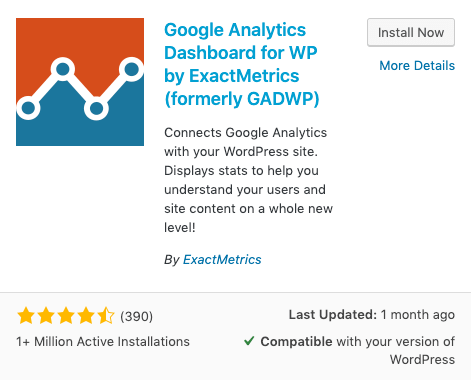
2. Either paste the Javascript provided by Google in the <HEAD> of every page on your website or install the Google Analytics Dashboard for WP plugin.
For this example, I’m going to use the plugin.
Search for the plugin in your wp-admin. Click Install Now and then Activate:
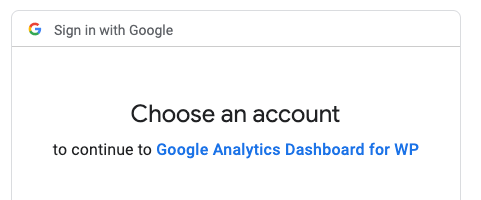
Click Google Analytics in your sidebar, and then click Authorize Plugin:
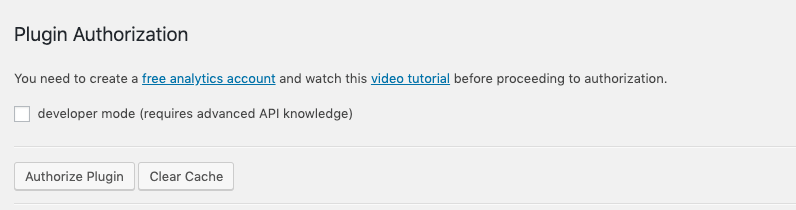
Click Get Access Code:
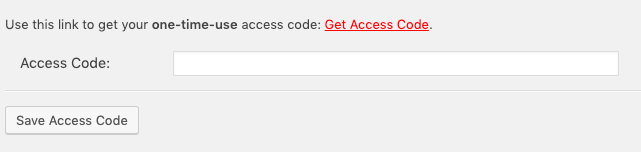
This will prompt you to connect your Google Analytics account. Follow the prompts:
Copy the access code provided.
Now Google will start tracking all hits to your website!
3. Create the UTM link.
Google has a great tool to allow you to easily set up UTM links on the fly.
You can use their Campaign URL Builder here.
Depending on your marketing campaign, the values you enter will change. Mine will be for a banner ad for a summer book sale:
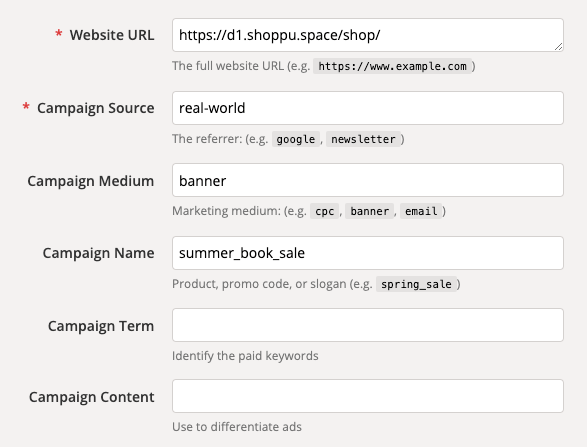
Copy the UTM link at the bottom of the page. Mine is:
https://d1.shoppu.space/shop/?utm_source=real-world&utm_medium=banner&utm_campaign=summer_book_sale
4. Set up a redirect from your vanity URL to the UTM link.
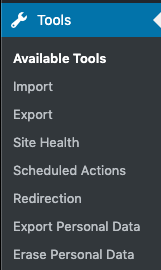
To get this done, install and activate the Redirection plugin.
Click Tools on your sidebar than then Redirection:
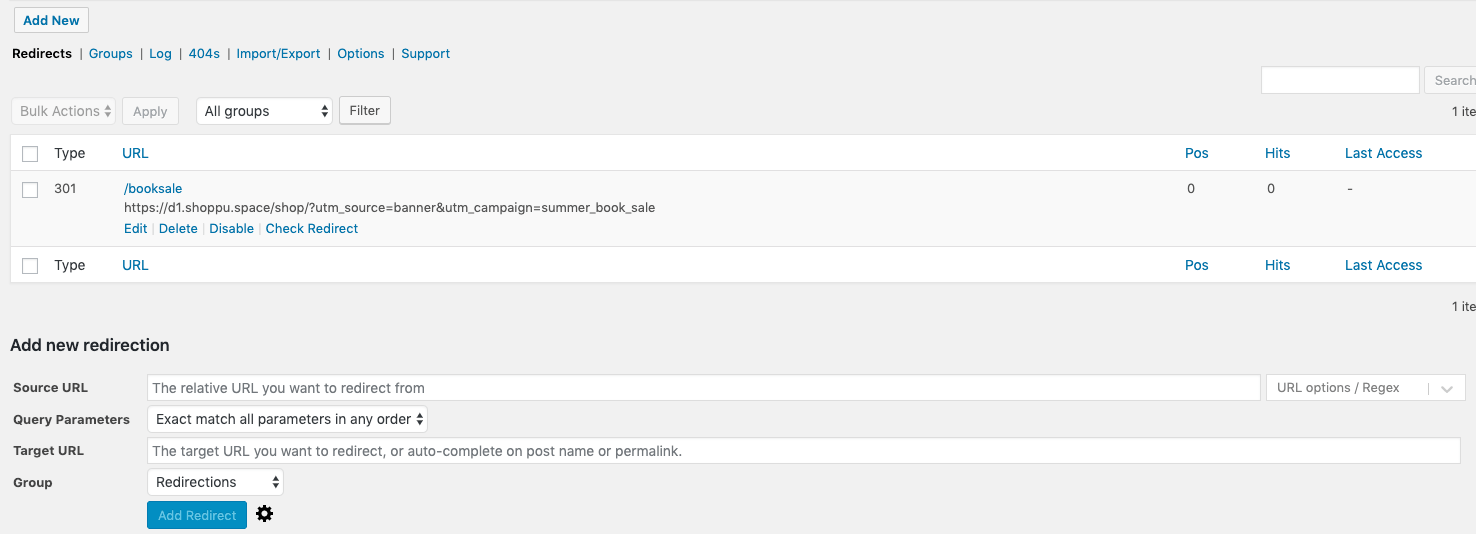
Once you are done the basic set-up, let’s create a redirect.
Under Source URL, type in the vanity URL you are going to use. I’m using /booksale.
Under Target URL, type in UTM link you made earlier.
Click Add Redirect.
You should now see this redirect appear:
That’s it! Now when someone sees our banner and punches in the URL, they will be redirected to the UTM link that Google Analytics will be able to track:
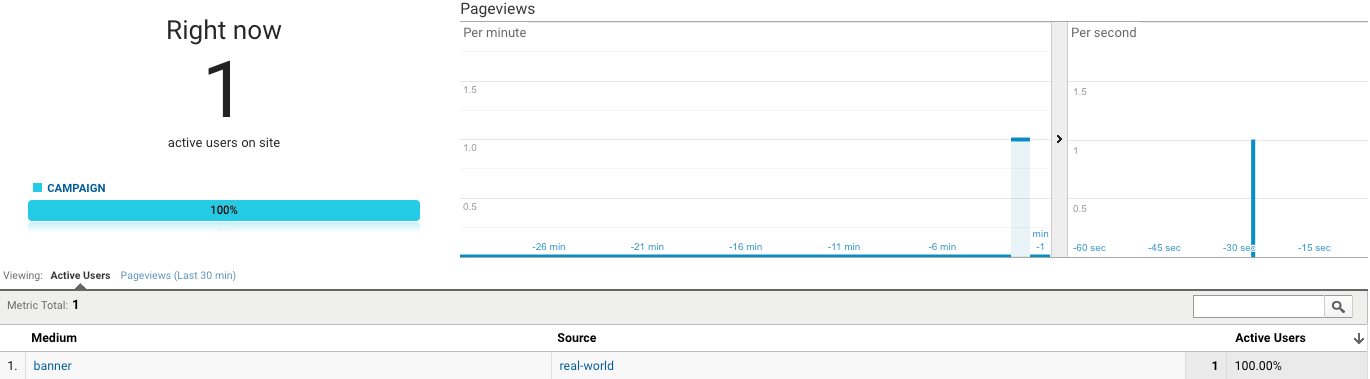
If we open up Google Analytics we can actually this in real time:
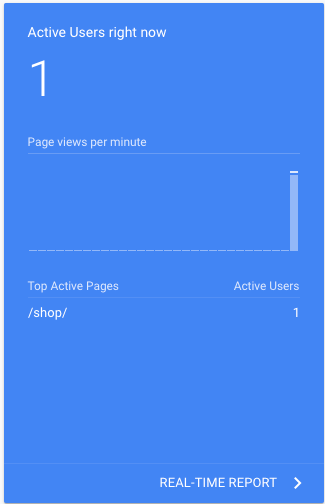
And if we open the real-time traffic sources report, we can see that the click is being correctly classified by medium and source:
Additionally, since the redirect plugin used above is tracking each redirect, we even have access to some stats like the total number of redirects (or vanity URL visits) right within WordPress.
Using Metorik to track your vanity URLs
Let’s take a quick look at how Metorik (our app) handles UTM links (and therefore vanity URLs) for WordPress and WooCommerce.
Individual Order Page
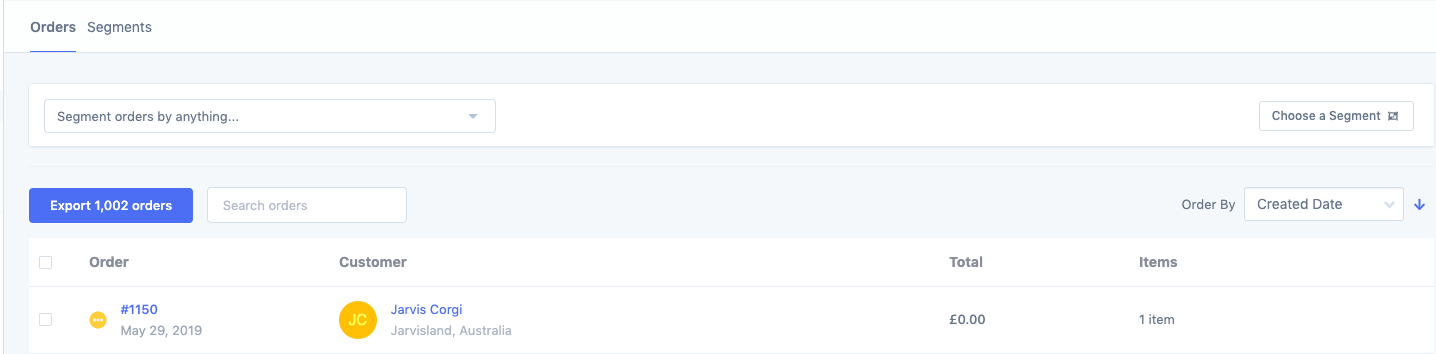
If we take a look at our orders, we can see that a new order has been made on our store by Javis the Corgi:
If we click on the order number, we are taken to the order page. From here we can easily see if an order came via a UTM link in the Source & Session Data section:

We can see that Jarvis must have seen one of our banner ads as they used our vanity URL d1.shoppu.space/booksale, which was redirected to: https://d1.shoppu.space/shop/?utm_source=real-world&utm_medium=banner&utm_campaign=summer_book_sale.
Segmenting Order By Source
Using Metorik’s segmenting system, we can segment all order by their UTM source. In this case, we can segment orders by UTM source and UTM medium:

Let’s segment by UTM medium contains banner:
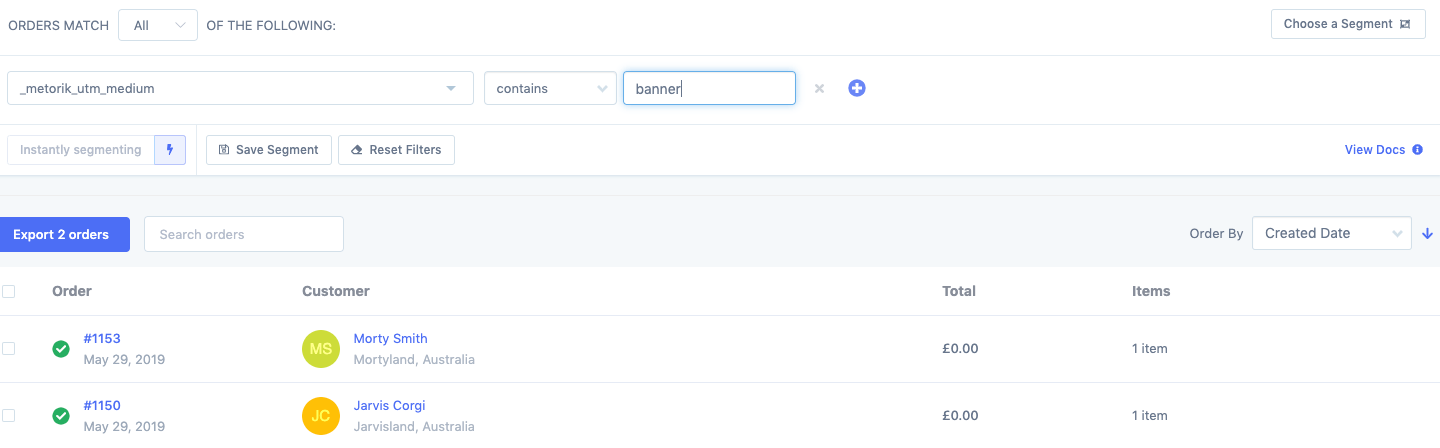
We can see that order by Jarvis, and a new order that has just been made by Morty Smith using the same vanity URL.
And here we can see in the Sources Report each UTM medium’s performance:
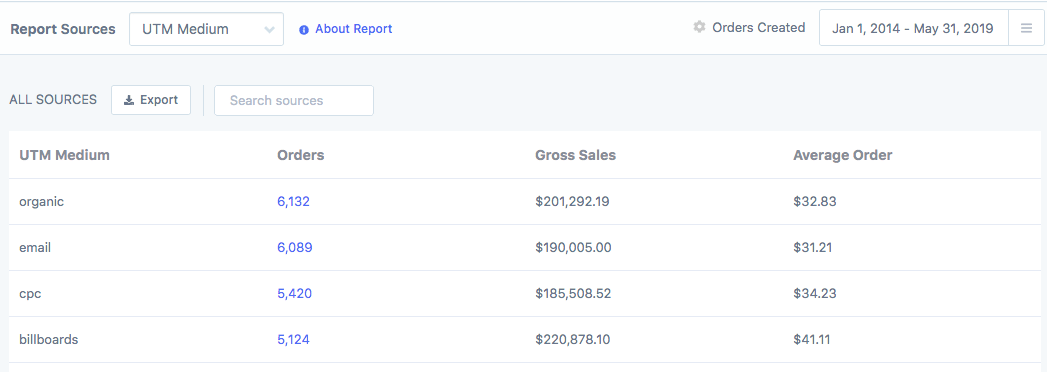
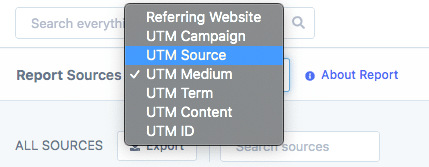
Of course, if you’d prefer, you can view the stats for each UTM source, campaign, etc. too:
You can see that if you are running multiple campaigns, each with different UTM links and vanity URLs, keeping track of how each one is going can quickly get complex and out of hand. Metorik can help you quickly analyse how each campaign is going, and help you make informed business decisions on the fly.
Wrapping it up
Big companies like Spotify don’t have to be the only ones using vanity URLs to help them track their real-world marketing campaigns. I hope you now understand how easy it is to create a vanity URL in WordPress! And by leveraging Metorik they can transform the way you analyse the effectiveness of all your marketing campaigns from a sales perspective.